#1. Configuración del proyecto
Primero, necesitamos cargar las bibliotecas. Asegúrate de que todos estén instalados correctamente. Además, estoy usando Python 3.12.3.
## 1.1 Load libraries# If you need to install any library, run below:
# pip install library1 library2 library3 ...
# Basic Libraries
import os # For file operations
import gc # For garbage collection, it avoids RAM memory issues
import numpy as np # For dealing with matrices
import pandas as pd # For dealing with dataframes
import janitor # For data cleaning (mainly column names)
import numexpr # For fast pd.query() manipulation
import inflection # For string manipulation
import unidecode # For string manipulation
# Geospatial Libraries
import geopandas as gpd # For dealing with shapefiles
import pyogrio # For fast .gpkg file manipulation
import ee # For Google Earth Engine API
import contextily as ctx # For basemaps
import folium # For interactive maps
# Shapely Objects and Geometry Manipulation
from shapely.geometry import mapping, Polygon, Point, MultiPolygon, LineString # For geometry manipulation
# Raster Data Manipulation and Visualization
import rasterio # For raster manipulation
from rasterio.mask import mask # For raster data manipulation
from rasterio.plot import show # For raster data visualization
# Plotting and Visualization
import matplotlib.pyplot as plt # For plotting and data visualization
from matplotlib.colors import ListedColormap, Normalize # For color manipulation
import matplotlib.colors as colors # For color manipulation
import matplotlib.patches as mpatches # For creating patch objects
import matplotlib.cm as cm # For colormaps
# Data Storage and Manipulation
import pyarrow # For efficient data storage and manipulation
# Video Making
from moviepy.editor import ImageSequenceClip # For creating videos (section 4.7 only) - check this if you have issues: https://github.com/kkroening/ffmpeg-python
A continuación, asegúrese de tener una carpeta para este proyecto. Todos los recursos y resultados se guardarán allí. Esta carpeta puede estar ubicada en su disco local, en una solución de almacenamiento basada en la nube o en una carpeta específica en Google Drive donde guardará los rásteres recuperados mediante la API de GEE.
Al ejecutar su código, asegúrese de reemplazar la dirección a continuación con la ruta de su proyecto. Usuarios de Windows, recuerden siempre usar \\ en lugar de /.
# 1.2 Set working directory
project_path = 'path_to_your_project_folder' # Where you will save all outcomes and resources must be in
os.chdir(project_path) # All resources on the project are relative to this path# 1.3 Further settings
pd.set_option('compute.use_numexpr', True) # Use numexpr for fast pd.query() manipulation
Finalmente, esta función es útil para dibujar geometrías en OpenStreetMap (OSM). Es especialmente útil cuando se trabaja con archivos de forma desconocidos para garantizar la precisión y evitar errores.
## 1.4 Set function to plot geometries over an OSM
def plot_geometries_on_osm(geometries, zoom_start=10):# Calculate the centroid of all geometries to center the map
centroids = [geometry.centroid for geometry in geometries]
avg_x = sum(centroid.x for centroid in centroids) / len(centroids)
avg_y = sum(centroid.y for centroid in centroids) / len(centroids)
# Create a folium map centered around the average centroid
map = folium.Map(location=[avg_y, avg_x], zoom_start=zoom_start)
# Add each geometry to the map
for geometry in geometries:
geojson = mapping(geometry) # Convert the geometry to GeoJSON
folium.GeoJson(geojson).add_to(map)
return map
#2 Ejemplo único: Acrelândia (AC) en 2022.
Como ejemplo para crear una intuición del proceso, guardaremos, limpiaremos y planificaremos el uso del suelo en Acrelandia (AC) en 2022. Es una ciudad en medio del AMACRO región (la frontera de los tres estados de Soyazonas, C.Ad, y rondônia), donde el bosque, a menudo intacto, es rápidamente destruido.
En esta sección, explicaré el script paso a paso y luego estandarizaré el proceso para ejecutarlo en múltiples ubicaciones durante varios años. Dado que guardar rásteres grandes usando la API puede ser un proceso lento, recomiendo usarlo solo si necesita procesar algunas áreas o áreas pequeñas durante algunos años. Guardar grandes áreas en Google Drive puede llevar horas, por lo que recomiendo descargar los archivos LULC pesados para todo el país y luego limpiarlos, como haremos en un artículo futuro.
Para ejecutar el código, primero descargue y guarde el archivo IBGE¹ Shapefiles de ciudades brasileñas (seleccione Brasil > Municipios). Recuerde que puede utilizar cualquier archivo de forma en Brasil para ejecutar este algoritmo.
## 2.1 Get the geometry of the area of interest (Acrelândia, AC)
brazilian_municipalities = gpd.read_file('municipios/file.shp', engine='pyogrio', use_arrow=True) # Read the shapefile - you can use any other shapefile here. Shapefiles must be in your project folder, as set in 1.2
brazilian_municipalities = brazilian_municipalities.clean_names() # Clean the column names (remove special characters, spaces, etc.)
brazilian_municipalities.crs = 'EPSG:4326' # Set the CRS to WGS84 (MapBiomas uses this CRS)
brazilian_municipalities
## 2.2 Get geometry for Acrelândia, AC
city = brazilian_municipalities.query('nm_mun == "Acrelândia"') # Filter the geometry for Acrelândia, AC (can be any other city or set of cities)
city_geom = city.geometry.iloc[0] # Get the geometry of Acrelândia, AC
city_geom # See the geometry shape
Una vez que hayamos guardado con éxito el archivo de forma que queremos estudiar, crearemos un cuadro delimitador a su alrededor para recortar el ráster completo de MapBiomas. Luego lo registraremos en la API Python GEE.
## 2.3 Set the bounding box (bbox) for the area of interest
bbox = city_geom.bounds # Get the bounding box of the geometry
bbox = Polygon([(bbox[0], bbox[1]), (bbox[0], bbox[3]), (bbox[2], bbox[3]), (bbox[2], bbox[1])]) # Convert the bounding box to a Polygonbbox_xmin = bbox.bounds[0] # Get the minimum x coordinate of the bounding box
bbox_ymin = bbox.bounds[1] # Get the minimum y coordinate of the bounding box
bbox_xmax = bbox.bounds[2] # Get the maximum x coordinate of the bounding box
bbox_ymax = bbox.bounds[3] # Get the maximum y coordinate of the bounding box
bbox # See bbox around Acrelândia shape
# Plot the bounding box and the geometry of Acrelandia over an OSM map
plot_geometries_on_osm([bbox, city_geom], zoom_start=10)

Ahora accederemos a la API MapBiomas de Google Earth Engine. En primer lugar, debemos crear un proyecto en la nube en GEE utilizando una cuenta de Google. Asegúrate de tener suficiente espacio en tu cuenta de Google Drive.
A continuación, necesitamos autenticar el API de Python (una vez). Si es usuario de VSCode, tenga en cuenta que el cuadro de inserción del token aparece en la esquina superior derecha del IDE.
Todas las imágenes de la colección MapBiomas LULC están disponibles en el mismo artículo. Tenga en cuenta que puede modificar ligeramente este script para que funcione con otros elementos del catálogo GEE y otras colecciones de MapBiomas.
## 2.4 Acess MapBiomas Collection 8.0 using GEE API
# import ee - already imported at 1.1ee.Authenticate() # Only for the first time
ee.Initialize() # Run it every time you start a new session
# Define the MapBiomas Collection 8.0 asset ID - retrieved from https://brasil.mapbiomas.org/en/colecoes-mapbiomas/
mapbiomas_asset = 'projects/mapbiomas-workspace/public/collection8/mapbiomas_collection80_integration_v1'
asset_properties = ee.data.getAsset(mapbiomas_asset) # Check the asset's properties
asset_properties # See properties
Aquí, cada banda representa datos LULC para un año determinado. Asegúrese de que el código siguiente esté escrito correctamente. Esto selecciona la imagen para el año deseado, luego recorta el ráster sin procesar para un cuadro delimitador alrededor de la región de interés (ROI): Acrelândia, AC.
## 2.5 Filter the collection for 2022 and crop the collection to a bbox around Acrelândia, AC
year = 2022
band_id = f'classification_{year}' # bands (or yearly rasters) are named as classification_1985, classification_1986, ..., classification_2022mapbiomas_image = ee.Image(mapbiomas_asset) # Get the images of MapBiomas Collection 8.0
mapbiomas2022 = mapbiomas_image.select(band_id) # Select the image for 2022
roi = ee.Geometry.Rectangle([bbox_xmin, bbox_ymin, bbox_xmax, bbox_ymax]) # Set the Region of Interest (ROI) to the bbox around Acrelândia, AC - set in 2.3
image_roi = mapbiomas2022.clip(roi) # Crop the image to the ROI
Ahora guardamos el ráster recortado en Google Drive (en mi caso, en la carpeta “tutorial_mapbiomas_gee”). Asegúrese de haber creado la carpeta de destino en su disco antes de ejecutarla.
Intenté guardarlo localmente, pero parece que necesitas guardar los rásteres GEE en Google Drive (avísame si sabes cómo hacerlo localmente). Esta es la parte del código que lleva más tiempo. Para retornos de inversión grandes, esto puede llevar horas. Verifique su Administrador de tareas de GEE para ver si los rásteres se cargaron correctamente en la carpeta de destino.
## 2.6 Export it to your Google Drive (ensure you have space there and that it is properly set up)# Obs 1: Recall you need to authenticate the session, as it was done on 2.4
# Obs 2: Ensure you have enough space on Google Drive. Free version only gives 15 Gb of storage.
export_task = ee.batch.Export.image.toDrive(
image=image_roi, # Image to export to Google Drive as a GeoTIFF
description='clipped_mapbiomas_collection8_acrelandia_ac_2022', # Task description
folder='tutorial_mapbiomas_gee', # Change this to the folder in your Google Drive where you want to save the file
fileNamePrefix='acrelandia_ac_2022', # File name (change it if you want to)
region=roi.getInfo()['coordinates'], # Region to export the image
scale=30,
fileFormat='GeoTIFF'
)
# Start the export task
export_task.start()
#3. Dibuja el mapa
Ahora tenemos un ráster con datos LULC para un área delimitada alrededor de Acrelândia en 2022. Esto se guarda en la dirección siguiente (en Google Drive). Primero veamos cómo se ve.
## 3.1 Plot the orginal raster over a OSM
file_path = 'path_of_exported_file_at_google_drive.tif' # Change this to the path of the exported file# Plot data
with rasterio.open(file_path) as src:
data = src.read(1)
print(src.meta)
print(src.crs)
show(data)

En la colección MapBiomas LULC 8, cada píxel representa un tipo de uso de suelo específico según esta listaPor ejemplo, «3» significa «Bosque natural», «15» significa «Pasto» y «0» significa «Sin datos» (píxeles rasterizados fuera de las fronteras brasileñas).
Exploraremos los datos que tenemos antes de representarlos gráficamente.
## 3.2 See unique values
unique_values = np.unique(data)
unique_values # Returns unique pixels values in the raster# 0 = no data, parts of the image outside Brazil
## 3.3 See the frequency of each class (except 0 - no data)
unique_values, counts = np.unique(data[data != 0], return_counts=True) # Get the unique values and their counts (except zero)
pixel_counts = pd.DataFrame({'value': unique_values, 'count': counts})
pixel_counts['share'] = (pixel_counts['count'] / pixel_counts['count'].sum())*100
pixel_counts

En definitiva, trabajamos con una gran matriz en la que cada elemento representa cómo se utiliza cada pequeño terreno de 30m x 30m.
## 3.4 See the actual raster (a matrix in which each element represents a pixel value - land use code in this case)
data
Ahora necesitamos organizar nuestros datos ráster. En lugar de clasificar cada píxel por uso exacto del suelo, los clasificaremos de manera más amplia. Dividiremos los píxeles en bosque natural, vegetación natural no forestal, agua, pastos, agriculturaY otro usos. Más específicamente, estamos interesados en monitorear la conversión de bosques naturales en pastos. Para lograr esto, reasignaremos los valores de píxeles según el mapbiomas_categories dict a continuación, que sigue la Categorización de cobertura y uso de la tierra (LULC) de MapBiomas.
El siguiente código recorta el ráster hasta los límites de Acrelândia y reasigna los píxeles según el mapbiomas_categories dict. Luego lo guarda como un nuevo ráster en ‘reassigned_raster_path’. Tenga en cuenta que el ráster antiguo se guardó en Google Drive (después de cargarlo usando la API de GEE), mientras que el nuevo se guardará en la carpeta del proyecto (en mi caso, una carpeta de OneDrive en mi PC, como se define en la sección 1.2). A partir de aquí solo usaremos el ráster reasignado para trazar los datos.
Esta es la parte principal del guión.. Si tiene alguna duda sobre lo que está sucediendo aquí (recortar para Acrelândia y luego reasignar píxeles a categorías más amplias), le recomiendo ejecutarlo e imprimir los resultados de cada paso.
mapbiomas_categories = {
# Forest (= 3)
1:3, 3:3, 4:3, 5:3, 6:3, 49:3, # That is, values 1, 3, 4, 5, 6, and 49 will be reassigned to 3 (Forest)
# Other Non-Forest Natural Vegetation (= 10)
10:10, 11:10, 12:10, 32:10, 29:10, 50:10, 13:10, # That is, values 10, 11, 12, 32, 29, 50, and 13 will be reassigned to 10 (Other Non-Forest Natural Vegetation)
# Pasture (= 15)
15:15,
# Agriculture (= 18)
18:18, 19:18, 39:18, 20:18, 40:18, 62:18, 41:18, 36:18, 46:18, 47:18, 35:18, 48:18, 21:18, 14:18, 9:18, # That is, values 18, 19, 39, 20, 40, 62, 41, 36, 46, 47, 35, 48, 21, 14, and 9 will be reassigned to 18 (Agriculture)
# Water ( = 26)
26:26, 33:26, 31:26, # That is, values 26, 33, and 31 will be reassigned to 26 (Water)
# Other (= 22)
22:22, 23:22, 24:22, 30:22, 25:22, 27:22, # That is, values 22, 23, 24, 30, 25, and 27 will be reassigned to 22 (Other)
# No data (= 255)
0:255 # That is, values 0 will be reassigned to 255 (No data)
}
## 3.5 Reassing pixels values to the MapBiomas custom general categories and crop it to Acrelandia, AC limits
original_raster_path = 'path_to_your_google_drive/tutorial_mapbiomas_gee/acrelandia_ac_2022.tif'
reassigned_raster_path = 'path_to_reassigned_raster_at_project_folder' # Somewhere in the project folder set at 1.2with rasterio.open(original_raster_path) as src:
raster_array = src.read(1)
out_meta = src.meta.copy() # Get metadata from the original raster
# 3.5.1. Crop (or mask) the raster to the geometry of city_geom (in this case, Acrelandia, AC) and thus remove pixels outside the city limits (will be assigned to no data = 255)
out_image, out_transform = rasterio.mask.mask(src, [city_geom], crop=True)
out_meta.update({
"height": out_image.shape[1],
"width": out_image.shape[2],
"transform": out_transform
}) # Update metadata to the new raster
raster_array = out_image[0] # Get the masked raster
modified_raster = np.zeros_like(raster_array) # Base raster full of zeros to be modified
# 3.5.2. Reassign each pixel based on the mapbiomas_categories dictionary
for original_value, new_value in mapbiomas_categories.items():
mask = (raster_array == original_value) # Create a boolean mask for the original value (True = Replace, False = Don't replace)
modified_raster[mask] = new_value # Replace the original values with the new values, when needed (that is, when the mask is True)
out_meta = src.meta.copy() # Get metadata from the original raster
out_meta.update(dtype=rasterio.uint8, count=1) # Update metadata to the new raster
with rasterio.open(reassigned_raster_path, 'w', **out_meta) as dst: # Write the modified raster to a new file at the reassigned_raster_path
dst.write(modified_raster.astype(rasterio.uint8), 1)
## 3.6 See the frequency of pixels in the reassigned raster
with rasterio.open(reassigned_raster_path) as src:
raster_data = src.read(1)
unique_values = np.unique(raster_data)
total_non_zero = np.sum(raster_data != 255) # Count the total number of non-zero pixelsfor value in unique_values:
if value != 255:  # Exclude no data (= 255)
count = np.sum(raster_data == value) # Count the number of pixels with the value
share = count / total_non_zero # Calculate the share of the value
share = share.round(3) # Round to 3 decimal places
print(f"Value: {value}, Count: {count}, Share: {share}")

Ahora trazamos los datos con colores genéricos. Mejoraremos el mapa más adelante, pero este es sólo un primer (¿o segundo?) vistazo. Tenga en cuenta que configuré específicamente 255 (= sin datos, píxeles fuera de Acrelândia) en blanco para una mejor visualización.
## 3.7 Plot the reassigned raster with generic colors
with rasterio.open(reassigned_raster_path) as src:
data = src.read(1) # Read the raster data
unique_values = np.unique(data) # Get the unique values in the rasterplt.figure(figsize=(10, 8)) # Set the figure size
cmap = plt.cm.viridis # Using Viridis colormap
norm = Normalize(vmin=data.min(), vmax=26) # Normalize the data to the range of the colormap (max = 26, water)
masked_data = np.ma.masked_where(data == 255, data) # Mask no data values (255)
plt.imshow(masked_data, cmap=cmap, norm=norm) # Plot the data with the colormap
plt.colorbar(label='Value') # Add a colorbar with the values
plt.show()

Ahora es el momento de crear una hermosa tarjeta. Elegí Matplotlib porque quiero mapas estáticos. Si prefieres coropletas interactivas, puedes usar Trama.
Para obtener más detalles sobre coropletas con Matplotlib, consulte su documentacion, Guía GeoPandasy el gran Yan Holtz Galería de gráficos de Python – de donde obtengo mucha inspiración y herramientas para DataViz en Python. Además, para disfrutar de hermosas paletas de colores, coolors.co es un gran recurso.
Asegúrese de que todas las bibliotecas de visualización de datos estén cargadas correctamente para ejecutar el código siguiente. También intenté cambiar el orden de los parches, pero no sabía cómo hacerlo. Déjame saber si descubres cómo hacerlo.
## 3.8 Plot the reassigned raster with custom colors# Define the colors for each class - notice you need to follow the same order as the values and must be numerically increasing or decreasing (still need to find out how to solve it)
values = [3, 10, 15, 18, 22, 26, 255] # Values to be colored
colors_list = ['#6a994e', '#a7c957', '#c32f27', '#dda15e', '#6c757d', '#0077b6','#FFFFFF'] # HEX codes of the colors used
labels = ['Natural Forest', 'Other Natural Vegetation', 'Pasture', 'Agriculture', 'Others', 'Water', 'No data'] # Labels displayed on the legend
cmap = colors.ListedColormap(colors_list) # Create a colormap (cmap) with the colors
bounds = values + [256] # Add a value to the end of the list to include the last color
norm = colors.BoundaryNorm(bounds, cmap.N) # Normalize the colormap to the values
img = plt.imshow(raster_data, interpolation='nearest', cmap=cmap, norm=norm) # Plot the data with the colormap
legend_patches = [mpatches.Patch(color=colors_list[i], label=labels[i]) for i in range(len(values)-1)] # Create the legend patches withou the last one (255 = no data)
# Create the legend
plt.legend(handles = legend_patches, # Add the legend patches
bbox_to_anchor = (0.5, -0.02), # Place the legend below the plot
loc = 'upper center', # Place the legend in the upper center
ncol = 3, # Number of columns
fontsize = 9, # Font size
handlelength=1,# Length of the legend handles
frameon=False) # Remove the frame around the legend
plt.axis('off') # Remove the axis
plt.title('Land Use in Acrelândia, AC (2022)', fontsize=20) # Add title
plt.savefig('figures/acrelandia_ac_2022.pdf', format='pdf', dpi=1800) # Save it as a PDF at the figures folder
plt.show()

4. Funciones estandarizadas
Ahora que hemos desarrollado una intuición sobre cómo descargar, guardar, limpiar y trazar rásteres de MapBiomas LULC. Es tiempo de generalizar el proceso.
En esta sección, definiremos funciones para automatizar estos pasos para cualquier forma y año. A continuación, ejecutaremos estas funciones en bucle para analizar una ciudad específica, Porto Acre, AC, de 1985 a 2022. Finalmente, haremos un vídeo que ilustrará la evolución de LULC en esta área durante el período especificado.
Primero, guarde un cuadro delimitador (bbox) alrededor de la región de interés (ROI). Simplemente ingrese la geometría que desee y especifique el año. Esta función guardará el ráster bbox alrededor del ROI en su Google Drive.
## 4.1 For a generic geometry in any year, save a bbox around the geometry to Google Drivedef get_mapbiomas_lulc_raster(geom, geom_name, year, folder_in_google_drive):
ee.Authenticate() # Only for the first time
ee.Initialize() # Run it every time you start a new session
my_geom = geom
bbox = my_geom.bounds # Get the bounding box of the geometry
bbox = Polygon([(bbox[0], bbox[1]), (bbox[0], bbox[3]), (bbox[2], bbox[3]), (bbox[2], bbox[1])]) # Convert the bounding box to a Polygon
bbox_xmin = bbox.bounds[0] # Get the minimum x coordinate of the bounding box
bbox_ymin = bbox.bounds[1] # Get the minimum y coordinate of the bounding box
bbox_xmax = bbox.bounds[2] # Get the maximum x coordinate of the bounding box
bbox_ymax = bbox.bounds[3] # Get the maximum y coordinate of the bounding box
mapbiomas_asset = 'projects/mapbiomas-workspace/public/collection8/mapbiomas_collection80_integration_v1'
band_id = f'classification_{year}'
mapbiomas_image = ee.Image(mapbiomas_asset) # Get the images of MapBiomas Collection 8.0
mapbiomas_data = mapbiomas_image.select(band_id) # Select the image for 2022
roi = ee.Geometry.Rectangle([bbox_xmin, bbox_ymin, bbox_xmax, bbox_ymax]) # Set the Region of Interest (ROI) to the bbox around the desired geometry
image_roi = mapbiomas_data.clip(roi) # Crop the image to the ROI
export_task = ee.batch.Export.image.toDrive(
image=image_roi, # Image to export to Google Drive as a GeoTIFF
description=f"save_bbox_around_{geom_name}_in_{year}", # Task description
folder=folder_in_google_drive, # Change this to the folder in your Google Drive where you want to save the file
fileNamePrefix=f"{geom_name}_{year}", # File name
region=roi.getInfo()['coordinates'], # Region to export the image
scale=30,
fileFormat='GeoTIFF'
)
export_task.start() # Notice that uploading those rasters to Google Drive may take a while, specially for large areas
# Test it using Rio de Janeiro in 2022
folder_in_google_drive = 'tutorial_mapbiomas_gee'
rio_de_janeiro = brazilian_municipalities.query('nm_mun == "Rio de Janeiro"')
rio_de_janeiro.crs = 'EPSG:4326' # Set the CRS to WGS84 (this project default one, change if needed)
rio_de_janeiro_geom = rio_de_janeiro.geometry.iloc[0] # Get the geometry of Rio de Janeiro, RJteste1 = get_mapbiomas_lulc_raster(rio_de_janeiro_geom, 'rio_de_janeiro', 2022, folder_in_google_drive)
En segundo lugar, recorte el ráster para incluir solo los píxeles de geometría y guárdelo como un ráster nuevo.
Elegí guardarlo en Google Drive, pero puedes editar `reassigned_raster_path` para guardarlo en cualquier otro lugar. Si lo cambia, asegúrese de actualizar el resto del código en consecuencia.
También puede reasignar píxeles según sea necesario cambiando el mapbiomas_categories dict. El número de la izquierda representa los valores de píxeles originales y el número de la derecha representa los valores reasignados (nuevos).
## 4.2 Crop the raster for the desired geometry
def crop_mapbiomas_lulc_raster(geom, geom_name, year, folder_in_google_drive):
original_raster_path = f'path_to_your_google_drive/{folder_in_google_drive}/{geom_name}_{year}.tif'
reassigned_raster_path = f'path_to_your_google_drive/{folder_in_google_drive}/cropped_{geom_name}_{year}.tif'my_geom = geom
mapbiomas_categories = {
# Forest (= 3)
1:3, 3:3, 4:3, 5:3, 6:3, 49:3,
# Other Non-Forest Natural Vegetation (= 10)
10:10, 11:10, 12:10, 32:10, 29:10, 50:10, 13:10,
# Pasture (= 15)
15:15,
# Agriculture (= 18)
18:18, 19:18, 39:18, 20:18, 40:18, 62:18, 41:18, 36:18, 46:18, 47:18, 35:18, 48:18, 21:18, 14:18, 9:18,
# Water ( = 26)
26:26, 33:26, 31:26,
# Other (= 22)
22:22, 23:22, 24:22, 30:22, 25:22, 27:22,
# No data (= 255)
0:255
} # You can change this to whatever categorization you want, but just remember to adapt the colors and labels in the plot
with rasterio.open(original_raster_path) as src:
raster_array = src.read(1)
out_meta = src.meta.copy() # Get metadata from the original raster
# Crop the raster to the geometry of my_geom and thus remove pixels outside the city limits (will be assigned to no data = 0)
out_image, out_transform = rasterio.mask.mask(src, [my_geom], crop=True)
out_meta.update({
"height": out_image.shape[1],
"width": out_image.shape[2],
"transform": out_transform
}) # Update metadata to the new raster
raster_array = out_image[0] # Get the masked raster
modified_raster = np.zeros_like(raster_array) # Base raster full of zeros to be modified
# Reassign each pixel based on the mapbiomas_categories dictionary
for original_value, new_value in mapbiomas_categories.items():
mask = (raster_array == original_value) # Create a boolean mask for the original value (True = Replace, False = Don't replace)
modified_raster[mask] = new_value # Replace the original values with the new values, when needed (that is, when the mask is True)
out_meta = src.meta.copy() # Get metadata from the original raster
out_meta.update(dtype=rasterio.uint8, count=1) # Update metadata to the new raster
with rasterio.open(reassigned_raster_path, 'w', **out_meta) as dst: # Write the modified raster to a new file at the reassigned_raster_path
dst.write(modified_raster.astype(rasterio.uint8), 1)
teste2 = crop_mapbiomas_lulc_raster(rio_de_janeiro_geom, 'rio_de_janeiro', 2022, folder_in_google_drive)
Ahora vemos la frecuencia de cada píxel en el ráster recortado y reasignado.
## 4.3 Plot the cropped raster
def pixel_freq_mapbiomas_lulc_raster(geom_name, year, folder_in_google_drive):
reassigned_raster_path = f'path_to_your_google_drive/{folder_in_google_drive}/cropped_{geom_name}_{year}.tif'with rasterio.open(reassigned_raster_path) as src:
raster_data = src.read(1)
unique_values = np.unique(raster_data)
total_non_zero = np.sum(raster_data != 255) # Count the total number of non-zero pixels
for value in unique_values:
if value != 255: # Exclude no data (= 255)
count = np.sum(raster_data == value) # Count the number of pixels with the value
share = count / total_non_zero # Calculate the share of the value
share = share.round(3)
print(f"Value: {value}, Count: {count}, Share: {share}")
teste3 = pixel_freq_mapbiomas_lulc_raster('rio_de_janeiro', 2022, folder_in_google_drive)
Finalmente, trazamos todo en un mapa. Puede modificar los argumentos a continuación para ajustar características como colores, etiquetas, posición de los títulos, tamaño de fuente, etc. También existe la opción de elegir el formato en el que desea guardar los datos (normalmente PDF o PNG). Los archivos PDF son más pesados y conservan la resolución, mientras que los PNG son más livianos pero tienen una resolución más baja.
## 4.4 Plot the cropped raster
def plot_mapbiomas_lulc_raster(geom_name, year, folder_in_google_drive,driver):
reassigned_raster_path = f'/Users/vhpf/Library/CloudStorage/GoogleDrive-vh.pires03@gmail.com/My Drive/{folder_in_google_drive}/cropped_{geom_name}_{year}.tif'
with rasterio.open(reassigned_raster_path) as src:
raster_data = src.read(1)# Define the colors for each class - notice you need to follow the same order as the values
values = [3, 10, 15, 18, 22, 26, 255] # Must be the same of the mapbiomas_categories dictionary
colors_list = ['#6a994e', '#a7c957', '#c32f27', '#dda15e', '#6c757d', '#0077b6','#FFFFFF'] # Set your colors
labels = ['Natural Forest', 'Other Natural Vegetation', 'Pasture', 'Agriculture', 'Others', 'Water', 'No data'] # Set your labels
cmap = colors.ListedColormap(colors_list) # Create a colormap (cmap) with the colors
bounds = values + [256] # Add a value to the end of the list to include the last color
norm = colors.BoundaryNorm(bounds, cmap.N) # Normalize the colormap to the values
img = plt.imshow(raster_data, interpolation='nearest', cmap=cmap, norm=norm) # Plot the data with the colormap
legend_patches = [mpatches.Patch(color=colors_list[i], label=labels[i]) for i in range(len(values)-1)] # Create the legend patches without the last one (255 = no data)
# Create the legend
plt.legend(handles = legend_patches, # Add the legend patches
bbox_to_anchor = (0.5, -0.02), # Place the legend below the plot
loc = 'upper center', # Place the legend in the upper center
ncol = 3, # Number of columns
fontsize = 9, # Font size
handlelength=1.5,# Length of the legend handles
frameon=False) # Remove the frame around the legend
plt.axis('off') # Remove the axis
geom_name_title = inflection.titleize(geom_name)
plt.title(f'Land Use in {geom_name_title} ({year})', fontsize=20) # Add title
saving_path = f'figures/{geom_name}_{year}.{driver}'
plt.savefig(saving_path, format=driver, dpi=1800) # Save it as a .pdf or .png at the figures folder of your project
plt.show()
teste4 = plot_mapbiomas_lulc_raster('rio_de_janeiro', 2022, folder_in_google_drive, 'png')
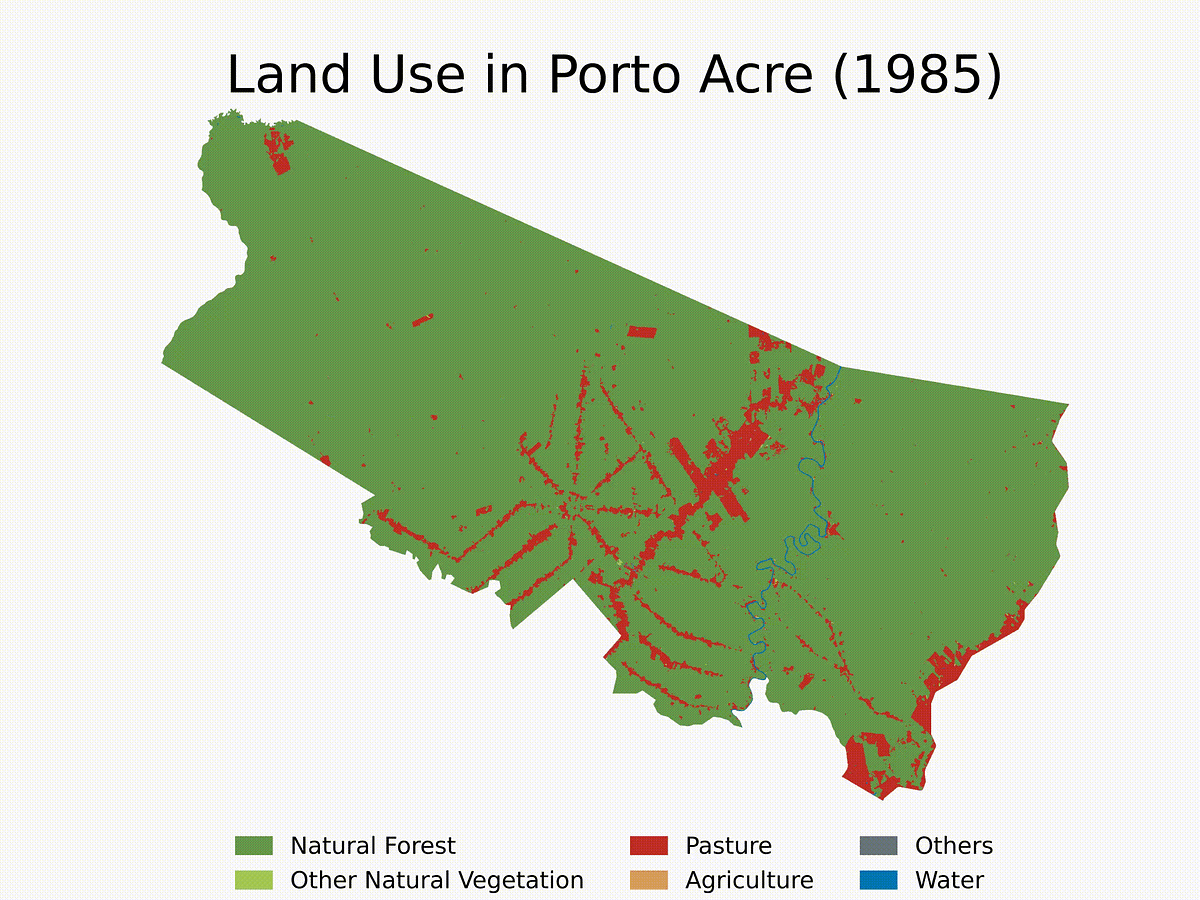
Finalmente, aquí hay un ejemplo del uso de las funciones y la creación de un bucle para obtener la evolución de LULC para Porto Acre (AC) desde 1985. Esta es otra ciudad de la región AMACRO con tasas de deforestación vertiginosas.
## 4.5 Do it in just one function - recall to save rasters (4.1) before
def clean_mapbiomas_lulc_raster(geom, geom_name, year, folder_in_google_drive,driver):
crop_mapbiomas_lulc_raster(geom, geom_name, year, folder_in_google_drive)
plot_mapbiomas_lulc_raster(geom_name, year, folder_in_google_drive,driver)
print(f"MapBiomas LULC raster for {geom_name} in {year} cropped and plotted!")
## 4.6 Run it for multiple geometries for multiple years### 4.6.1 First, save rasters for multiple geometries and years
cities_list = ['Porto Acre'] # Cities to be analyzed - check whether there are two cities in Brazil with the same name
years = range(1985,2023) # Years to be analyzed (first year in MapBiomas LULC == 1985)
brazilian_municipalities = gpd.read_file('municipios/file.shp', engine='pyogrio', use_arrow=True) # Read the shapefile - you can use any other shapefile here
brazilian_municipalities = brazilian_municipalities.clean_names()
brazilian_municipalities.crs = 'EPSG:4326' # Set the CRS to WGS84 (this project default one, change if needed)
selected_cities = brazilian_municipalities.query('nm_mun in @cities_list') # Filter the geometry for the selected cities
selected_cities = selected_cities.reset_index(drop=True) # Reset the index
cities_ufs = [] # Create list to append the full names of the cities with their UF (state abbreviation, in portuguese)
nrows = len(selected_cities)
for i in range(nrows):
city = selected_cities.iloc[i]
city_name = city['nm_mun']
city_uf = city['sigla_uf']
cities_ufs.append(f"{city_name} - {city_uf}")
folder_in_google_drive = 'tutorial_mapbiomas_gee' # Folder in Google Drive to save the rasters
for city in cities_list:
for year in years:
city_geom = selected_cities.query(f'nm_mun == "{city}"').geometry.iloc[0] # Get the geometry of the city
geom_name = unidecode.unidecode(city) # Remove latin-1 characters from the city name - GEE doesn`t allow them
get_mapbiomas_lulc_raster(city_geom, geom_name, year, folder_in_google_drive) # Run the function for each city and year
### 4.6.2 Second, crop and plot the rasters for multiple geometries and years - Make sure you have enough space in your Google Drive and all rasters are there
for city in cities_list:
for year in years:
city_geom = selected_cities.query(f'nm_mun == "{city}"').geometry.iloc[0]
geom_name = unidecode.unidecode(city)
clean_mapbiomas_lulc_raster(city_geom, geom_name, year, folder_in_google_drive,'png') # Run the function for each city and year
gc.collect()
Terminaremos el tutorial creando un breve vídeo que muestre la evolución de la deforestación en el municipio durante las últimas cuatro décadas. Tenga en cuenta que puede ampliar el análisis a varias ciudades y seleccionar años específicos para el análisis. No dudes en personalizar el algoritmo según tus necesidades.
## 4.7 Make a clip with LULC evolution
img_folder = 'figures/porto_acre_lulc' # I created a folder to save the images of the LULC evolution for Porto Acre inside project_path/figures
img_files = sorted([os.path.join(img_folder, f) for f in os.listdir(img_folder) if f.endswith('.png')]) # Gets all the images in the folder that  end with .png - make sure you only have the desired images in the folderclip = ImageSequenceClip(img_files, fps=2)  # 2 FPS, 0.5 second between frames
output_file = 'figures/clips/porto_acre_lulc.mp4' # Save clip at the clips folder
clip.write_videofile(output_file, codec='libx264') # It takes a while to create the video (3m30s in my pc)